Followers

Saturday, 3 June 2017

YOU ARE AT TREASURED FRIEND ~ CARD GIVE-AWAY

Hello and welcome...
I have a lovely poppy card to give-away today.
I applied 'glossy accents' by Ranger to the poppy head and die cut the flower head twice to add more dimension 
This is an ivory card with thin mats of red mirri.
If you would like to give this card a new home just leave me a comment, you have until 9.45am Monday morning and the winner will be announced at 10am.
International friends are very welcome to comment too

Have a great weekend

Thank you for taking the time to visit my blog, I hope my designs have given a little inspiration.
I read all your comments and really appreciate you leaving me a message.
June x

Friday, 2 June 2017

NEW STOCK & TWO SPECIAL OFFERS

Hello and welcome...

This is another notelet size card using the Butterfly Die from the Stained Glass Collection by Sue Wilson and 2 beautiful additions to our stock of  the Cosmic Shimmer Polished Silk Glitter Range
  • I used the remaining leftover white card stock  from yesterday's notelet card
  • on a separate piece of white card I added enough double sided adhesive sheet to cover the die 
  • I then die cut and embossed the Butterfly - Stained Glass Collection Die 
  • Lavender Polished Silk Glitter was carefully sprinkled onto both flower heads but as you can see a little 'escaped'.  This I don't mind at all as it gives the card a 'shadow effect' or possibly it could be another flower behind the main two.... that's my thinking and I'm happy to stay with that lol
  • the remainder of the image was sprinkled with Ice Blue Polished Glitter
  • this was then adhered to the card base
  • I die cut the image again on black card and added Cosmic Shimmer Dries Clear Glue to the whole of the back then adhered it onto my card
We added Ice Blue & Lavender Polished Silk Glitter and I must say they are so beautiful and so silky smooth to touch.  I'm sure that once you've tried this glitter you won't want to use any other!

the first special offer is free p&p on any of the above pots of glitter
    the second special offer is the die I used on yesterday's card,
     Tattered Lace Double Delights Adore Die rrp £27.99 (!!)

    I only have 2 remaining at £10 each inc p&p


Should you wish to purchase either of the above please email me at:

Don't forget that tomorrow is the
Saturday Special Give-Away Card
see you back then

Thank you for taking the time to visit my blog, I hope my designs have given a little inspiration.
 I read all your comments and really appreciate you leaving me a message
                                                         June x


Thursday, 1 June 2017

THURSDAY TUTORIAL ~ HELLO

Hello and welcome...

Notelet Card
Sometimes you just need to send a friend or a family member a little note for one reason or another and today's card is ideal for that 
I used the largest die from Spellbinders's A2 Matting Basics B to die cut my white card base as shown above and below 
 
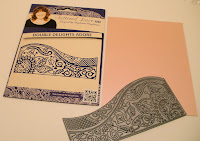
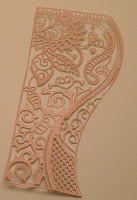
With a piece of Crafter's Companion Pearlised Pink Card I die cut the Double Delights Adore Die by Tattered Lace
Before
After 
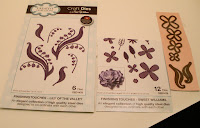
I used the Sweet Williams Die Set from the Finishing Touches Range by Sue Wilson for Creative Expressions for my flowers, and the flourishes from the Lily Of The Valley Die Set from the Finishing Touches Range
Flowers & flourishes die cut and ready for shaping 
Shaped, then I added Cosmic Shimmer Dries Clear Glue to adhere my flowers together.  I also added a few stamens to both flowers.  I sprayed the back of the Double Delights Adore Die with a spray adhesive by Crafter's Companion then placed it onto my base card.  I then glued the flowers together, added a few stamens and adhered the flowers to the card.  The flourishes were glued in place around the flowers
From the Sweet Wishes Range Stamps by Creative Expressions I chose the petite Hello stamp and stamped this using Ranger Archival Ink in Coffee 
The finished card
Thank you for taking the time to visit my blog, I hope my designs have given a little inspiration.
I read all your comments and really appreciate you leaving me a message
June x


Wednesday, 31 May 2017

WEDDING CARD COMMISSION NUMBER 2!

Hello and welcome...
I have the second wedding card commission to show you today
I stayed with a white and silver theme for this card
  • the base is a 7" square, top folding
  • a smaller mat of white card
  • then a mat of silver mirri card
  • and finally a smaller mat of white card - I purposely left approximately 1.5" of the base card plain because of all the detail being shown
  • I placed the inner heart die from the Jewelled Heart from the Fillables Range by SW for CE to the left of the card then cut and die cut it
  • I them embossed the card using the cascading hearts embossing folder by SW for CE
  • using both the decorative frame and inner heart die I cut and embossed these onto silver mirri card
  • I glued the heart shaped treat cup into place and secured it further by adding tape around the edges (this does not show)
  • with more silver mirri card I die cut several of the smaller hearts from the same set and placed them into the treat cup and secured them in place by adding a piece of acetate across the back
  • I typed the sentiment then die cut it using the larger of the heart dies from the same set and ran a silver paint pen around the edge prior to adhering to the card and added one silver heart to the top right of the card
  • I used foamarin to make the white roses, they did not look as bright in the flesh as they do on the photo! I also added a few strands of pearls to sit behind the floral arrangement
  • a personal verse was inserted to complete the card
Thank you for taking the time to visit my blog, I hope my designs have given a little inspiration
I read all your comments and really appreciate you leaving me a message
June x

Tuesday, 30 May 2017

HAPPY BIRTHDAY ~ WITH MUTED TONES


Hello and welcome...
  • this is a 5"x7" white base card
  • I created mats of black and red card and an off white Yupo top card
  • the Poppy stamps are by Woodware
  • the 2 poppy flowers were stamped with a 'Pale Tomato' ink pad and I apologise as these were in a set I received and I have mislaid the make!
  • I then used a similar shade of distress ink and blended darker shades to the flowers, coloured the stems and the 2 leaves
  • once complete this was glued onto the thin mats and adhered to the card at a 'jaunty' angle.....  I'm into jaunty at the moment if you hadn't realised LOL
  • I'm also into 'splattering' which is what I also did to the card, using the pale tomato ink pad, water and 2 brushes ~ before I glued it to the mats!
  • to complete the card I added 3 red gems to the top right and 3 red gems to the bottom left of the card and inserted a verse
Thank you for taking the time to visit my blog, I hope my designs have given a little inspiration.
 I read all your comments and really appreciate you leaving me a message.
    June x

Monday, 29 May 2017

WEDDING CARD COMMISSION

Hello and welcome...
This is one of two wedding cards my nephew asked me to make
  • I used an 8" white card base and added a mat of silver mirri card to it
  • I embossed a smaller white mat using the  Cascading Hearts EF by Sue Wilson for Creative Expressions and adhered it to the base card
  • Using white card I die cut and embossed the bride and groom from the Special Occasion Collection ~ The Happy Couple Die Set by SW for CE
  • I die cut this again in black card and cut the legs from the male and glued them onto the original die cut
  • I traced the bride's outline onto the same white card, cut it out and glued it behind the lace wedding dress as shown above.  I added Glitter Jewels in Diamond Snow to the dress and veil
  • using a Spectrum noir flesh coloured pen I coloured the back of the bride's neck, her arm and the groom's hand
  • From the Frames & Tags Collection I die cut and embossed the Lauren Die using the two largest outer dies in white card stock
  • Using the outer die only from the same set I die cut it again onto silver mirri card
  • These were then adhered together and the largest oval die, from the same set, was placed into the middle section and die cut, as well as die cutting silver mirri with the same oval die
  • I typed a sentiment onto white card stock and with the next size oval from the same die set I die cut it and glued it on top of the oval mirri
  • now using the same two oval dies I die cut a narrow frame 3 times, glued them together and adhered it around the sentiment
  • Mounting foam was added to the back and placed on the card at a 'jaunty' angle
  • I added the narrowest red line tape approximately one inch from the bottom of the card, removed the backing and carefully added the pretty row of pearls
  • the bride and groom had mounting foam added to the back and positioned above the row of pearls
  • to complete I added a verse to the inside and  two pearls hearts to the top right but left enough room to add a flat back pearl in the centre just for a little contrast
Thank you for taking the time to visit my blog, I hope my designs have given a little inspiration.
 I read all your comments and really appreciate you leaving me a message
June x


AND THE WIINER IS......

Hello and welcome...

Using Random.org Name Picker it has chosen

YOU


Littlelamb

Congratulations
Please email me with your full postal details to:


Today's new post will be available at 10.30am
 
See you back here then
June x

Sunday, 28 May 2017

HAPPY BIRTHDAY - WORKING CANDY MACHINE

Hello and welcome...
Here is today's card, a working and refillable candy machine
I made this especially for my great-niece's 8th birthday
  • with the working candy machine die set I die cut the front of the machine in a pale glittered pink card (my niece is a very girly girl :)) and backed it with white card stock
  • I cut a piece of pale pink A4 card stock in half for the front and back of the machine
  • without using the outer cutting die I placed only the candy machine die onto the pale pink card and die cut it
  • I then embossed it to add texture
  • this was then adhered to one of the pre-cut foam cores, you need two to make this machine, the second one goes onto the back of the machine
As this is a detailed procedure to make, but well worth it at the end, I'm stopping here with further instructions as  I am hoping to make a video tutorial where you will be able to see this first hand
In the meantime...
Thank you for taking the time to visit my blog, I hope my designs have given a little inspiration. I read all your comments and really appreciate you leaving me a message.
June x
Code line 7 9 is for loading jQuery library. Remove this line if you’ve already loaded it somewhere else in your blog. Hint: If your blog has an image slider, carousel or something with fading effect running, chances are it is powered by jQuery. If this widget doesn’t work, the first thing you want to do is comment out or remove this line. To use your own button, replace the URL in line 3 with the direct link URL to the image. Make sure to keep the quotes. To reposition the button, replace center in line 4 with the new position as listed below: