At last!.... we have had some hiccups with the blog and posting, you will see on yesterday's post the huge spaces between some of the text, but on checking, prior to posting, the text looked how it should be presented! No matter what we tried it would not change. Today, well today is nearly over, but we have finally been able to post the tutorial and I thought the title was most fitting too lol!
ok, let's get started by showing you the finished card
Firstly, I must give credit to Sue Wilson (SW) who created the 'fire and ice' technique.
The base of my card is a white 8" square. I added thin layers of taupe foundation card by Creative Expressions (CE) and gold mirri from my stash.
I then embossed a top layer of coconut white foundation card by CE using the Nordic Tile embossing folder by SW for CE as shown below
The crisp detail of this embossing folder is gorgeous!
The next stage, below, is covering the whole piece of
A4 white foundation card with a double sided adhesive sheet by CE then applying
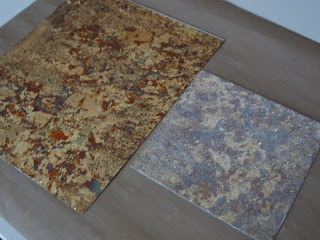
Gilding Flakes in Mulled Wine by CE. When using gilding flakes I always cover the whole of an A4 card and what I don't use is stored for future use, usually for making flowers or other embellishments
You actually don't use a lot of the gilding flakes as you'll see in the next picture!
I placed the flakes randomly over the now sticky card and using a piece of Rubit Scrubit by CE I burnished them into the card. You have to remember not to breath, cough or sneeze anywhere near the flakes because they are weightless and would scatter everywhere!
All covered and the colour is very rich. You can see how little has been used by the amount in the gilding flakes pot. This part if the 'fire'
I then cut the size I needed for the centre of the card, covered that with double sided adhesive sheet and sprinkled Cosmic Shimmer Glitter Jewels in Diamond Snow and burnished it into the card. This is now the ice part of the technique
I added mounting foam to the back and adhered this onto the centre of the card
Using the Sydney Die Set from SW's Australian Collection I placed dies 1, 2 and 3 onto a piece of coconut white card and ran it through the Platinum Machine. I number the dies from the outer to the inner. As this was being adhered onto glittered card I used Cosmic Shimmer Dries Clear Glue.
Using the Double Pierced Squares by SW for CE I die cut two frames, one in coconut white the other in gold mirri card. I added mounting foam to the back of each and adhered around the main focal point
Using a
Distress Ink Pad in Black Soot I stamped the
Hello Sentiment by Creative Expressions, onto coconut white card then matted it onto gold mirri card
Thank you for visiting, I read all your comments and appreciate you taking the time to leave me a message and hope my designs have given a little inspiration.
June x


