Followers

Saturday, 6 May 2017

SATURDAY SPECIAL GIVE-AWAY CARD

Hi, thanks for stopping by...


Today's give-away card may possibly be a good one for the man in your life or someone who loves to garden?
I stamped the image onto white card and used several water coloured pencils to colour it.  I also used two other pencils, from the same pack, to gently create rays around the main focal point.
The sentiment is one that I've had for several years and could possibly be from Spellbinders's range.

If you would like to give this card a new home just leave me a message in the comment box below and the winner will be announced at 10am Monday morning.

Enjoy your weekend
INGREDIENTS:
  • white and green card ~ from my stash
  • pear stamp ~ Woodware
  • sentiment ~ ?Spellbinders
  • 24 Watercolour Pencils by Derwent
  • Cosmic Shimmer Dries Clear PVA Glue ~ Creative Expressions
  • Mounting foam ~ Woodware
Thank you for taking the time to visit my blog. I read all your comments and appreciate you leaving me a message and hope my designs have given a little inspiration

June x

Friday, 5 May 2017

ANOTHER BLAST FROM THE PAST

Hi, thanks for stopping by...
The second 'blast from the past' card!
I used ivory card and a pretty printed green paper for the backing.  Die cut the main focal point in ivory card and added some die cut flowers, flourishes and one butterfly.
A white satin bow was also adhered at a 'jaunty' angle

Tomorrow is

SATURDAY SPECIAL ~ GIVE AWAY CARD

Pop back tomorrow, and comment on the card that will be shown, all comments are entered into Random.org Name Picker and the winner announced Monday morning

Thank you for taking the time to visit my blog. I read all your comments and appreciate you leaving me a message and hope my designs have given a little inspiration

June x


Thursday, 4 May 2017

PRETTY IN PINK

Hi, thanks for stopping by...


Over the next few days I will be posting cards that I made a little while ago (pre Blog) and this is the first!  I would class this as a CAS card (clean and simple).

The size is an A5 and I added thin mats of pink and white card.  The final layer being white and I placed, in my opinion, a very pretty and lace effect oval die onto the card, die cut and embossed it.  A wider piece of pink card was added towards the bottom on the card then I used both sets of bow dies, the plain one in pink, the patterned one in white that was then adhered to the pink layers and glued onto the border.

The finishing touches were: a gem to the centre of the bow, pearls around the oval shape, a few more pearls added around the card as shown above and one butterfly

Thank you for taking the time to visit my blog. I read all your comments and appreciate you leaving me a message and hope my designs have given a little inspiration

June x

Wednesday, 3 May 2017

Hi, thanks for stopping by... 
I love the scene this pretty paper portrays and it is the paper that makes this card!

I used an 8" square white card base and from one of my 12" paper pads I chose the above paper, trimmed it so I could mat it to a thin black mat and glued it to the card base.  I put it to one side and kept going back to it thinking should I add one flower are more..... rightly or wrongly you can see the decision I came too!
 
I used two sets of dies, both by Sue Wilson for Creative Expressions and added a pinkish red gem to the string flowers and a pearl gem to the poppy flowers.  I die cut the spring foliage in white card and used Diamond Snow to give them a touch of sparkle


I used my Wink Of Stella pen to add a touch of sparkle to the fence posts and stamped 'Memories' with Distress Ink 'Black Soot'

  Thank you for taking the time to visit my blog. I read all your comments and appreciate you leaving me a message and hope my designs have given a little inspiration
June  x
INGREDIENTS:
  •  black foundation card ~ Creative Expressions
  • decorative paper ~ my stash
  • Sting flowers die set ~ Sue Wilson for CE
  • Poppies die set ~ Sue Wilson for CE
  • Diamond Snow Glitter Jewels ~ CE
  • Cosmic Shimmer Dries Clear PVA Glue ~ CE
  • flat back pearls ~ CE
  • Ranger's Distress Ink ~ Black Soot
  • Memories stamp ~ my stash
  • coloured gems ~ my stash
  • Wink Of Stella Glitter Pen


  • Tuesday, 2 May 2017

    GIVE A GIRL THE RIGHT SHOES

    Hi, thanks for stopping by...

    A quick and easy make for this card..... once I knew what I was going to do! LOL

    Once again I halved an A4 white card to give an A5.  I continued to add thin mats of  white and red card. The final white card was embossed using the 'Falling Snow EF' by Sue Wilson for Creative Expressions (currently one of my favourites at the moment) and I rounded the bottom corners only using a large corner punch by Woodware.

    I stamped the 'Glamour Shoes' Stamp Set by Woodware onto white card, coloured them using ProMarkers in red and black but for the insoles and soles I used one of the new Chameleon Pens in Bisque.  I then went over the shoes using a 'Wink Of Stella Glitter Pen'.

    The 'Give A Girl'..... is part of the Glamour Shoe Set, I stamped this onto white card and die cut it using a Spellbinders's Die from my stash.

    On white card I typed the 'How Old' and 'Birthday Wishes Best Friend'.  The latter was die cut and matted onto a larger oval red card.

    I used a tag die to die cut the 'How Old'? covered it with a piece of double sided adhesive sheet, removed the backing and sprinkled 'Diamond Snow' by Creative Expressions

    Thank you for taking the time to visit my blog. I read all your comments and appreciate you leaving me a message and hope my designs have given a little inspiration

    June x
    INGREDIENTS:
    • white and red foundation card by Creative Expressions
    • Falling Snow embossing folder by Sue Wilson for Creative Expressions
    • Cosmic Shimmer Dries Clear PVA Glue by Creative Expressions
    • Diamond Snow Glitter Jewels by Creative Expressions
    • round corner punch by Woodware
    • Glamour Shoes Stamp Set by Woodware
    • red and black ProMarkers
    • bisque pen by Chameleon
    • Wink Of Stella' Glitter Pen
    Due To The Bank Holiday The Tuesday Tutorial Will Return Next Week

    Monday, 1 May 2017

    AND THE WINNER IS...

    Hello again!

    The Random Name Picker has done its work again and the winner is...

    Margaret F

    Please email me your postal details :)


    Random Name Picker

    Enter all names in the field below, each on a separate line:

    Margaret F

    BLAST FROM THE PAST

    Hi, thanks for stopping by...
    This is a quick post today as this is a card I made sometime ago and I don't have all the details available. 
    It is an A5 size white card base with mats of lilac and white card.  The top part of the card I die cut using a striplet die and left a small boarder so I could attach mounting foam to it then adhered it to the card.  I added small flat back pearls to the centres of the design. 
    The beautiful design on the bottom part of the card is also die cut and I added a little bit of sparkle to the centre part.
    I stamped a sentiment onto white card and die cut it using an oval die then matted it onto a slightly larger oval of lilac card.
    A few diamond gems strategically placed finished the card

    Come back at 10am when the  winner of Saturday's card will be announced

    Thank you for taking the time to visit my blog. I read all your comments and appreciate you leaving me a message and hope my designs have given a little inspiration

    June x

    Sunday, 30 April 2017

    HAPPY ANNIVERSARY

    Hi, thanks for stopping by...
    A second 'shabby chic' today but this card definitely is one that looks better in the flesh than on the picture!
    I matted the pretty purple paper onto an 8" white card blank and distressed part of the edges as well as curling over one corner. 
    I then added the white lace and a pearl corner embellishment.  I die cut the flowers, 5 white, 2 purple and glued them in position.  I also added several strands of pearls and dotted others around the focal point.
    I stamped 'Happy Anniversary' onto white card, used a tag punch to cut it, covered it with a double sided adhesive, removed the backing sheet then sprinkled it with glitter jewels

    Thank you for taking the time to visit my blog. I read all your comments and appreciate you leaving me a message and hope my designs have given a little inspiration

    June x
    INGREDIENTS:
    • purple paper/my own stash
    • white lace ribbon/Club Green
    • pearl strands/Club Green
    • corner pearl embellishment/Hobby House
    • stamens/Culpitt
    • glitter jewels/Creative Expressions
    • flat back pearls/Creative Expressions 

    Saturday, 29 April 2017

    SATURDAY SPECIAL ~ CARD GIVE AWAY

    Hi, thanks for stopping by...
    A little bit of shabby chic today!

    Leave me a comment in the box below if you would like the chance to own this card.  It will also be posted to you in a card box so that the floral arrangement does not get flattened.

    The winner will be chosen, using Random.org, on Monday morning

    Have a good Bank Holiday weekend

    June x

    Thank you for taking the time to visit my blog. I read all your comments and appreciate you leaving me a message and hope my designs have given a little inspiration

    Friday, 28 April 2017

    WHEN ALL ELSE FAILS, SMILE

    Hi, thanks for stopping by...
    I really like how this cute CAS card turned out!
    Brilliant White Foundation Card by Creative Expressions, Flower Stamp by Clarity, Sentiment Stamp by Altenew,  Victorian Velvet and Mustard See Distress Inks by Ranger and a few flat back pearls, edger die, also by
     Creative Expressions.
    The finished card is 4"x5"..... cute would you agree?


    I used the largest die from Spellbinders A2 Matting Basics B to die cut a top folding base card.  Using the next size down I die cut another piece of the brilliant white card. This was then die cut using one of the edger dies by Spellbinders, I no longer have the packing so I'm sorry I am unable to give you the name of it this time.
    I then drew a fine pencil mark to where the top and bottom die cuts ended on the card.  Easy lift off tape was applied to the right and left side of the card as I wanted a white border showing.
    I inked my blending tool with the 'barn door' ink pad and coloured the section of the  base card leaving space for the second colour, 'mustard seed'.  A clean blending tool was again used for this.
    I then inked the second stamp with Stazon in Jet Black and stamped it onto the base card, as shown.
    Mounting foam was applied to both pieces of card and adhered to the base card.
    And that is it, clean and simple
    Thank you for taking the time to visit my blog. I read all your comments and appreciate you leaving me a message and hope my designs have given a little inspiration

    We have the Saturday Special Give Away tomorrow, if you would like to give that card a new home all you need to do is leave me a comment and you'll be entered into the draw. 
    There aren't any restrictions as to where in the world you leave or how many times your name could be drawn

    See you back here tomorrow

    June x

    Thursday, 27 April 2017

    THANKS FOR BEING THERE FOR ME

    Hi, thanks for stopping by...


    I cut a piece of brilliant white foundation card by Creative Expressions to create a 5" square and leaving a small boarder.  Using the Petite Striplet Die - Jubilee (without the outer cutting die) by Sue Wilson for CE, I die cut 3 strips.  I then attached a piece of double sided adhesive to the back of this and using Cosmic Shimmer Polished Silk Glitter in Golden Sand, Silver Chrome and Rose Copper I sprinkled one of each colour over the strips, burnishing in with each application.  I can not emphasise enough how beautiful this glitter is!  It is very fine and does not 'fall off' the card.  The colours are so beautiful.  I adhered this to a mat of silver, black and white foundation card and added mounting foam to the back for dimension and then positioned it to the final mat of white, silver, black and white card.
    I stamped the sentiment using one of the stamps from the Live, Laugh, Love Sentiment Range by CE onto white card, I then attached another piece of double sided adhesive  sheet onto the sentiment, removed the backing and sprinkled Cosmic Shimmer Diamond Snow over it.  This was then placed into position on the card and to finish I add butterflies, 2 small and 1 medium that I also sprinkled Diamond Snow onto them as well as adding small, flat backed pearls to the spine of each butterfly, using Cosmic Shimmer Dries Clear PVA Glue.


    Thank you for taking the time to visit my blog. I read all your comments and appreciate you leaving me a message and hope my designs have given a little inspiration


    June x

    Wednesday, 26 April 2017

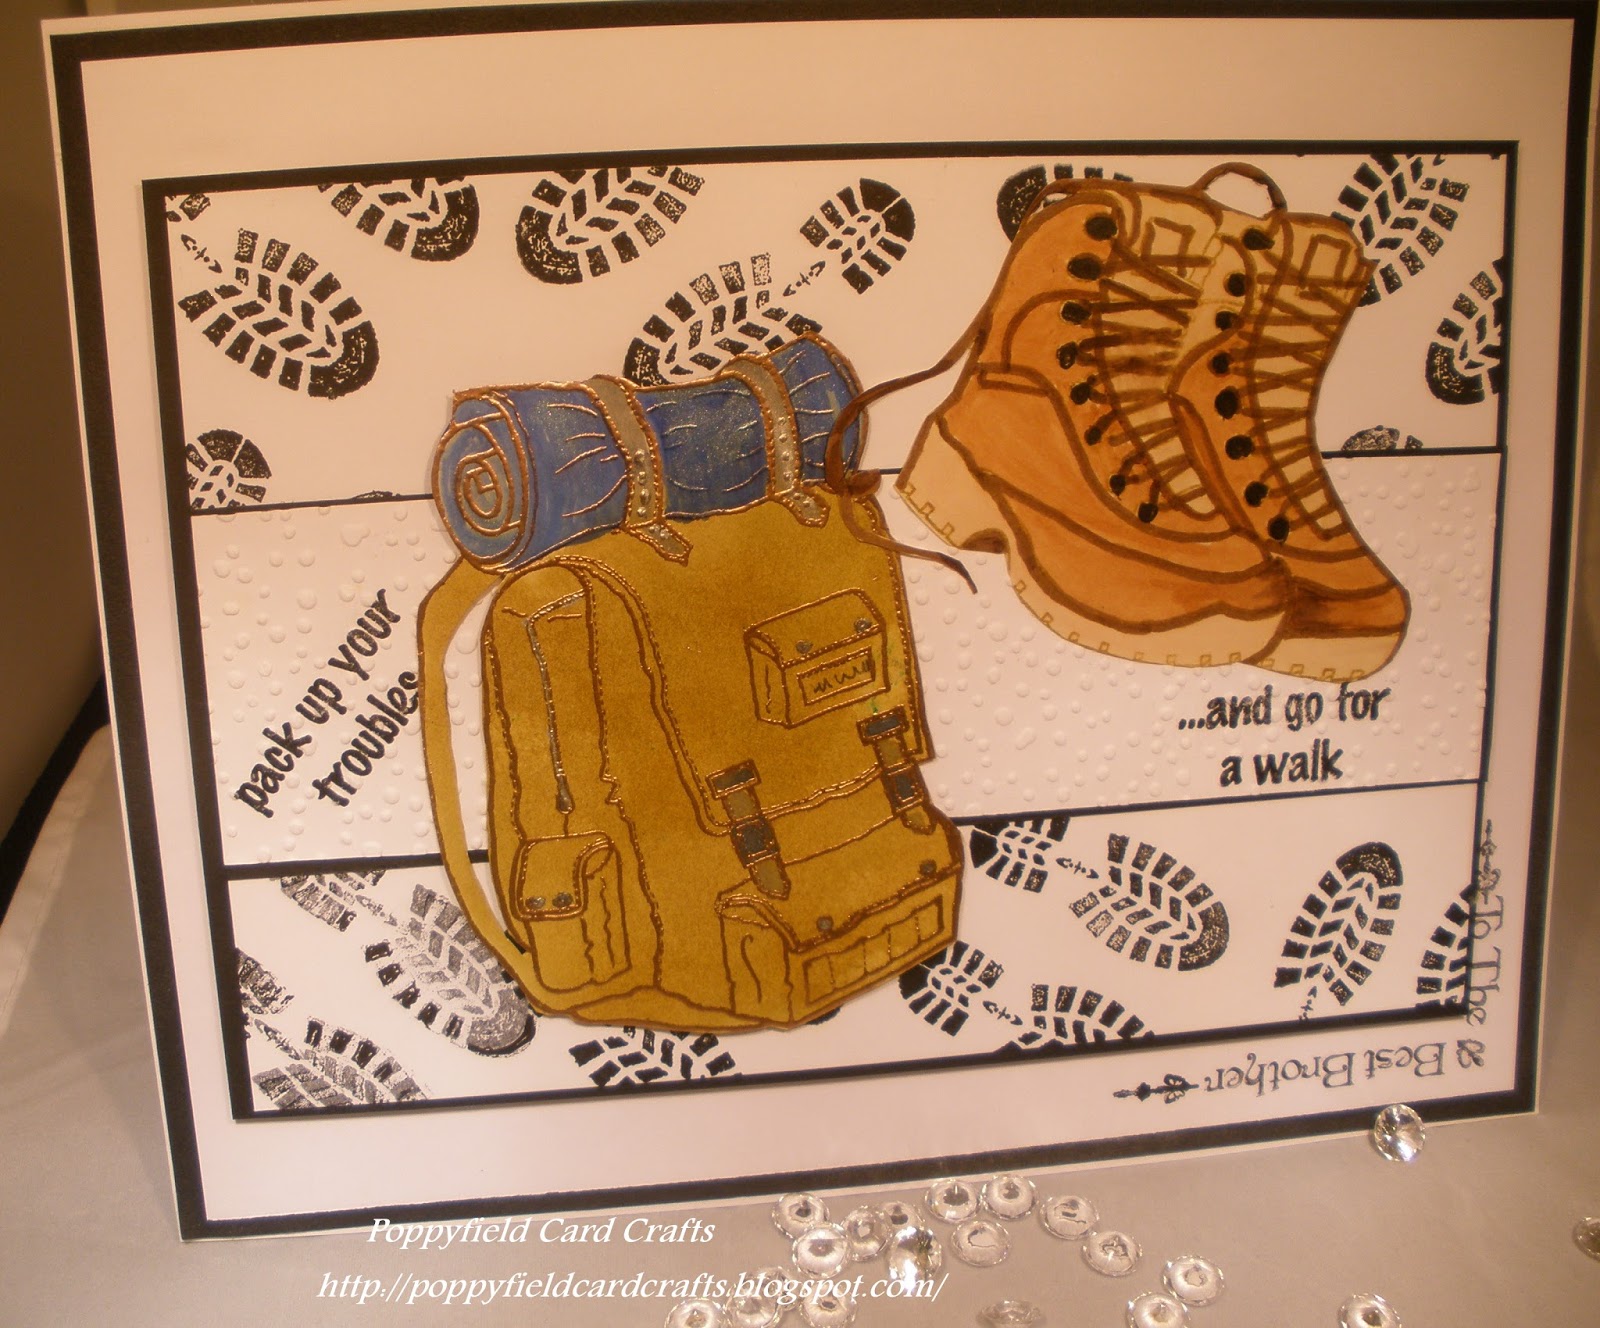
    PICK UP YOUR TROUBLES... AND GO FOR A WALK

    Hi, thanks for stopping by...
    Today is my brother's birthday and as he is an avid walker I could not resist using these set of stamps by Woodware!
    The white base card measures 9.5" x 8.5" and I added a layer of black then white foundation card.  To the bottom right I stamped a sentiment from one of the corner sets, designed by Phill Martin for Creative Expressions using a Stazon Jet Black Ink Pad.
    I cut a smaller piece of brilliant white foundation card and using another set of stamps by Woodware I stamped the soles of the boots again with the same Jet Black Ink Pad by Stazon and stamped 'off the page'.  I adhered this onto a thin black mat.
    I cut another piece of the brilliant white foundation card and using two of the sentiments that are part of the set, stamped onto the card, again using the same ink pad.  To add a little texture I then embossed this piece of white card with the 'Falling Snow' Embossing Folder by Sue Wilson for Creative Expressions.  I adhered this to a thin black mat and added that to the centre of the card.
    On taupe foundation card I stamped the back pack with Clear Perfect Medium Ink Pad then applied Metallic Copper Embossing Powder by WOW and heat set it.  I inked a 'smoothie' with Brushed Corduroy Distress Ink and coloured  the back pack.  I coloured the zipper  and studs using a silver paint pen then recoloured the studs with a black marker, but will change that and add the smallest black flat back pearls as I think it will be more affective!
    The sleeping bag was coloured using the new Chameleon Pens, as were the boots.  I fussy cut around the images, added mounting foam to the top and bottom and adhered to the card
     
    Thank you for taking the time to visit my blog. I read all your comments and appreciate you leaving me a message and hope my designs have given a little inspiration

    June x
    INGREDIENTS:
    • Walking Boots and Rucksack by Woodware available at Creative Expressions
    • Brilliant white, taupe and black foundation card by Creative Expressions
    • Stazon Jet Black Ink Pad
    • Falling Snow Embossing Folder - Creative Expressions
    • Clear Perfect Medium Ink Pad by Ranger
    • Metallic Copper Embossing Powder - WOW!
    • 'Smoothie' - Creative Expressions
    • Brushed Corduroy Distress Ink by Ranger
    • Silver Paint Pen - from my stash
    I am entering this card in the following blog challenge(s):
    • Allsorts Challenge 412 - I Spy With My......with 'B'


    Tuesday, 25 April 2017


    Hi again!

    My blog appears to have a mind of its own, so if do want to comment on today's post you will need to scroll, what seems like forever and a day, right to the bottom on the page!!

    I hope by tomorrow this annoying hiccup has gone

    All for now

    June x

    WORKING CANDY MACHINE

    Hi, thanks for stopping by...
    Due to the lack of internet over the past few weeks I am unable to do the
    'Tuesday Tutorial', and I apologise for this.
    So today I am showing you 2 Working Candy Machines that I made for two gorgeous
    young girls who also happen to be sisters ...


    The working candy machine is designed by Sue Wilson for Creative Expressions and, with a little imagination, there are so many designs you can make.   Be prepared to see the odd one or two pop up on my blog over the coming months! LOL.
    I used the girls' favourite colours to cover the base card, and in Tilley's machine the candy is actually purple to match the purple base, although it does appear to have more of a chocolate brown look whilst Daisy's is filled with pink candy to match the pink base.  As the girls were getting these at Easter I die cut a little bunny and gave the feet, ears and eyes a little colour and adhered them to the base as if they are looking up at the candy.
    These machines are also refillable too and it's quite fun turning the handle and seeing candy drop out of your greetings card!
    The main items, to make the candy machine, are shown below


    Code line 7 9 is for loading jQuery library. Remove this line if you’ve already loaded it somewhere else in your blog. Hint: If your blog has an image slider, carousel or something with fading effect running, chances are it is powered by jQuery. If this widget doesn’t work, the first thing you want to do is comment out or remove this line. To use your own button, replace the URL in line 3 with the direct link URL to the image. Make sure to keep the quotes. To reposition the button, replace center in line 4 with the new position as listed below: