Followers

Wednesday, 2 August 2017

THINKING OF YOU - TECHNICAL TUESDAY.... WOODGRAIN AFFECT

Hello and welcome...

Yesterday was unfortunate in that we had PC problems and I was unable to post anything.  I had planned to start the month with 'Technical Tuesday' and this is what I had been hoping to post....

At some time or another I think we can struggle making a 'male' card

This one is really quite easy to make and assemble and the wood grain can be achieved with tools you already own


 This is the stamp set and ink pad I used for the card (click on the photo to enlarge)

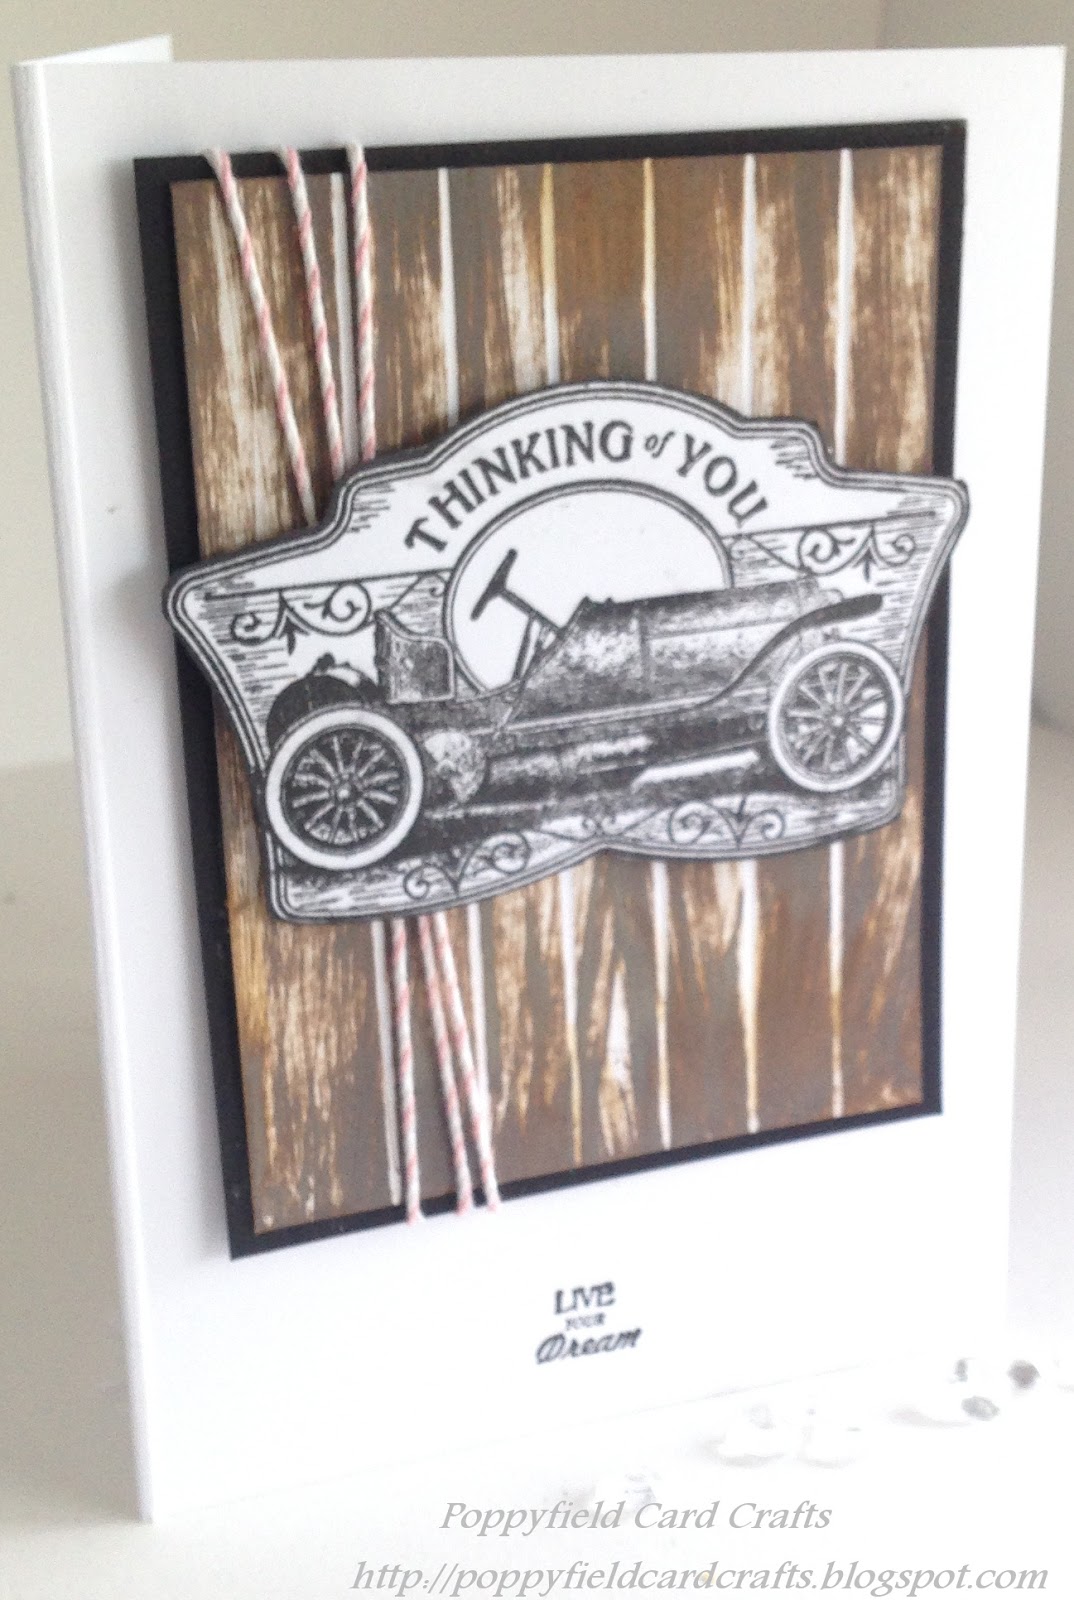
I started with a 13x18cm white card base and for the insert, as shown above,  I cut a smaller piece of white copy paper and applied a second generation stamp of the vehicle using the Versafine Onyx Black Ink Pad.
I placed the Happy Birthday stamp from the set on the blank space under the sentiment  and stamped it 
The wood grain affect is achieved by, cutting a piece of white card, (mine measures 9x13.5cm) and scoring it, vertically, then, using my Hougie Board, I scored the card at 1cm increments.  Next, using 'Walnut Stain' Distress Oxide Ink Pad I ran the pad down the scored card
Depending on the amount of pressure you use to ink the card you will see the different effects that can be achieved.
Once inked I buffed the area with a paper towel then backed the card onto a layer of black card.  I wrapped baker's twine' around the topper 3 times and secured it at the back with red line tape.

I stamped the vehicle stamp onto white card, fussy cut it and added mounting foam to the back.  I removed the backing from the tape and placed the topper onto the wood grain card, applied Cosmic Shimmer Glue to the back and adhered to the card base

To complete I stamped 'Live Your Dream' to the bottom on the card

INGREDIENTS:
    • white card ~ my stash
    • Baker's Twine ~ my stash
    • Going Places Vintage Labels (set of 16 cling stamps) ~ JustRite/Spellbinders
    • Versafine Onyx Black Ink Pad ~ Tsukineko
    • Walnut Stain Distress Oxide Ink Pad ~ Ranger
    • Cosmic Shimmer Dries Clear Acrylic Glue ~ Creative Expressions (CE)
    • Wax Paper ~ CE
Thank you for taking the time to visit my blog, I hope my designs have given a little inspiration.
I read all your comments and really appreciate you leaving me a message.
June x

Monday, 31 July 2017

CARD WINNER!

Hello and welcome...

Using Random.org Name Picker, the name picked to win Saturday's card is

Sue McFall

Congratulations!

Please email your postal details to:


More tomorrow....

Thank you for taking the time to visit my blog, I hope my designs have given a little inspiration.
I read all your comments and really appreciate you leaving me a message.
June x

FOUR CARDS, ONE DIE , ONE UPSIDE DOWN AND THE WRONG WAY AROUND!

Hello and welcome...
I love this 'stained glass die' from the Stained Glass Collection - Butterfly by Sue Wilson/Creative Expressions, and have enjoyed a little play with it trying out different backgrounds

This card is a 5" square, top folding note card.  I blanked the four sides with masking tape then applied  'worn lipstick' Distress Oxide Ink with a blending tool to the exposed area

I love how these oxide inks have a gorgeous smooth 'chalk' look when applied to card stock

I die cut and embossed the butterfly stained glass die on gold mirri card, applied Cosmic Shimmer Dries Clear Acrylic Glue/Creative Expressions, to the back of the die cut and placed it over the coloured area on the base card

I added a little glue to the centres of both flowers and replaced the gold centres

The second card is a 6" square

I cut purple card slightly smaller than 6" and embossed it with the 'Linen' Embossing Folder by Sue Wilson/Creative Expressions.  I added double sided tape to the back and adhered it to the card

Next I die cut an embossed a piece of white card stock with the butterfly die, then cut another piece of card the same size as the die and covered it with a piece of double sided adhesive sheet

I removed the backing paper and carefully added the die cut to the card

I covered two thirds of the image with the backing paper to mask the first application of glitter and then sprinkled Cosmic Shimmer Polished Silk Glitter in Silver Chrome to the exposed area and burnished in the glitter

Next I moved the backing paper further down the card and sprinkled the Polished Silk Glitter in Lavender and burnished that into the card 

Now removing all of the backing paper I sprinkled Golden Sand Cosmic Shimmer Polished Silk Glitter to that area and this was also burnished in

I cut a small piece of white card, stamped the sentiment 'Have A Happy Day' (from my stash) with a StazOn Jet Black Ink Pad by Ranger.  Added this to a slightly bigger piece of purple card then added this to a slightly bigger piece of white card.  I adhered it to the card and added one purple gem to it

On reflection I would not have added the lavender glitter this way but you live and learn


Card 3, another note card measuring 9cmx15cm (I can't find my half inch symbol on this programme lol)

I die cut and embossed  again, this time with silver mirri card and cut another piece of white card to fit exactly to it

A piece of double sided adhesive sheet was applied to the card, the backing removed and the die cut was adhered to it

Very carefully I added Rose Copper Polished Silk Glitter to the butterfly, Ice Blue Polished Silk Glitter to the larger flower and the leaves then Lavender Polished Silk Glitter to the smaller flower

The remaining exposed areas were covered with Golden Sand Polished Silk Glitter

I chose a sentiment from a new set of stamps by AltEnew, 'Crafty Friends' that said "Do Something Creative Every Day'..... which I thought  appropriate! T
he sentiment was stamped with StazOn

The final card is another note card, 4"x5"

  
I cut a smaller piece of black card and adhered this to my base card

I added a piece of double sided adhesive sheet to a piece of white card, slightly larger than the size of the die and die cut and embossed it

I sprayed adhesive to the back of the design then adhered it to the black card

As you can tell I used 3 of the polished silk glitters, Golden Sand, Rose Copper and Silver Chrome.  I must say that if I were to replicate this again I wouldn't cover the side panels with the 'rose copper' glitter, I would only add this colour to the centre as shown and continue with the gold and silver


This is the card that, after I added the sentiment to the side of it I realised I had the card upside down.... too late was the cry to change it LOL

I hope to see you back here at 10am to find out who won this Saturday's card


Thank you for taking the time to visit my blog, I hope my designs have given a little inspiration.
I read all your comments and really appreciate you leaving me a message.
June x

Sunday, 30 July 2017

YOU ARE ON MY MIND - RESIST TECHNIQUE

Hello and welcome...
Today I've used the 'resist technique' for this card

I started with an A4 hammered white card base, scored it in half then cut it to make a 5"x7" base card

I then masked all 4 sides of the card and stamped the French Rose Background Stamp using Perfect Medium clear embossing pad  then sprinkled 'True White' embossing powder over the image, removed the excess powder and heat set

Using 3 Distress Oxide ink pads (with separate blending tools), 'fossilized amber'/'worn lipstick'/'spiced marmalade' I added colour to the image.  I then 'polished' it all with a paper towel and gave it a gentle spritz with water

I carefully removed the masking tape and stamped a sentiment from the 'Amazing Sentiments' Stamp Sets with a StazOn Jet Black Ink Pad


Insert with verse 

I also used another of the sentiments from the same set to stamp a verse for the centre of my card

Using a stencil I inked one corner of the insert with the same 'worn lipstick' distress ink and the other corner with 'fossilized amber' distress ink

I also used a corner punch on all 4 corners of the insert

Click on the card for a closer look 

INGREDIENTS:
  • Hammered card stock ~ my stash
  • French Rose Background Stamp ~ JustRite CL-04355
  • True White Embossing Powder ~ Creative Expressions
  • Amazing Sentiments Stamp Set ~ Creative Expressions
  • Distress Oxide Inks ~ Ranger
  • Perfect Medium Clear Embossing Ink Pad ~ Ranger
  • Corner Punch ~ Woodware
  • Stencil ~ my stash
Thank you for taking the time to visit my blog, I hope my designs have given a little inspiration.
I read all your comments and really appreciate you leaving me a message.
June x

Saturday, 29 July 2017

SATURDAY GIVE AWAY CARD - SENDING CRAFTY HUGS YOUR WAY

Hello and welcome...
I have a fabulous set of AltEnew Stamps all relating to being crafty so you will be seeing lots of cards using these stamps and today's card uses 4 of them.  The sentiment, verse and 2 heart stamps 
I've used 3 different Distress Oxide Inks as well as a stencil to create the background, then die cut a frame to go around it

I added a piece of double sided adhesive sheet to white card and die cut and embossed 3 leaves.  Removed the backing sheet and sprinkled gold glitter onto the leaves then adhered them onto the card

I used one of the AltEnew stamps for the sentiment and die cut and embossed it with a pierced flag die then layered it onto a piece of the 'scrap' left-over card from the background

The insert was also decorated using the same method as above and more of the stamp set used for the verse.  The tiny hearts are also part of the set

To complete I also decorated one side of the envelope

If you would like to give this card a new home all you need to do is comment on this post.  The winner will be picked using Random.org Name Picker and you have until 9.30am Monday morning to comment


We ship international so it doesn't matter where you live or if you have won a card in the past

INGREDIENTS:
  • White card ~ Papermill Direct
  • Distress Oxide Inks/Cracked Pistachio, Broken China, Peeled Paint ~ Ranger
  • Crafty Friends Stamp Set ~ AltEnew
  • Pierced Flags Die Set ~ Sue Wilson/Creative Expressions (CE)
  • Autumn Leaf Trio Die Set/Sue Wilson ~ CE
  • Double Pierced Rectangles/Sue Wilson ~ CE
  • Cosmic Shimmer Dries Clear Acrylic PVA Glue
  • Red Line Tape
  • Platinum Die Cut/Emboss Machine ~ Spellbinders

Close up of sentiment
Envelope


Close up of the verse


Thank you for taking the time to visit my blog.  
I read all your messages and  really appreciate you taking the time to leave me a comment.
June x


    Friday, 28 July 2017

    FOR YOU

    Hello and welcome...
    I will start with an apology as the top right corner of the card seems to bend slightly, it's not, it's a shadow from the window blind!

    I started with an 8" square, white base card and embossed another piece of white card to diagonally fit to the bottom of it.   I used a wet glue to adhere this to the card

    The sentiment was then stamped and heat embossed using a  'metallic copper' embossing powder

    I then used both flowers from the Bold Blooms Stamp Set, stamped and heat embossed with a true white embossing powder onto vellum

    Using 3 different colours of felt tipped pens, a pale lemon, an orange and a muted green,  by Whispers Strokes (they don't have a named colour on them, just the coloured caps) I coloured the flowers from the back of the vellum then hand cut them

    I adhered the flowers onto the card using a glue dot behind both flower head centres and a little bit of wet glue to the stem of the smaller one and overlapped it onto the bigger flower stem

    I then made a row of faux pearls with a PVA glue, along the diagonal embossed card

    To complete I stamped the largest flower to the corner of the insert using an Archival Ink pad in 'coffee' and also stamped the verse with the same ink pad

    I stamped both flowers to the bottom left corner of the envelope, again using the same ink pad
    Card insert

    
    Envelope


    INGREDIENTS:

    • white card ~ Papermill Direct
    • Rambling Rose Embossing Folder/Sue Wilson ~ Creative Expressions (CE)
    • Metallic Copper Embossing Powder ~ WOW
    • Bold Blooms Stamp Set, includes sentiment stamp ~ Woodware JGS512
    • Vellum ~ Woodware
    • Cosmic Shimmer Detail True White Embossing Powder ~ CE
    • Verse stamp ~ CE
    • 'Whispers Strokes' Felt Tipped Pens ~ Sugarloaf
    • Wet glue/Cosmic Shimmer Dries Clear PVA Glue ~ CE
    • Faux Pearls ~ Cosmic Shimmer Specialist Pearl PVA ~ CE
    • Coffee Ink Pad ~ Archival/Ranger
    • Platinum Embossing Machine ~ Spellbinders
    Thank you for taking the time to visit my blog, I hope my designs have given a little inspiration.
     I read all your comments and really appreciate you leaving me a message.
                                                          June x

    SATURDAY IS ALWAYS OUR CARD GIVE-AWAY, LOOKING FORWARD TO SEEING YOU THEN


    Thursday, 27 July 2017

    WELCOME LITTLE ONE

    Hello and welcome...
    I made this card for my niece and her husband who have just become the very proud parents of  a little girl, their first baby

    I started with white card stock and die cut and embossed the frame from the Shadow Box Collection - New Arrival and added mounting foam to the back for dimension

    Next I embossed another piece of white card stock using the Love Hearts Embossing Folder and adhered the frame onto this

    From the Shadow Box Collection - Stitched Lattice Frames and using white card and the first and third dies I die cut and embossed to give me the larger outer frame.  I then used the first and second dies and die cut and embossed onto pink card.  I glued the pink card onto the white frame and adhered this over the main frame

    I combined several elements from New Arrival Set, the Little Treasures Set and the Stork and Baby Die Set to fill the cubbies

    I die cut the Welcome Little One sentiment 3 times on pink card, glued them together prior to placing them onto the main card

    I then adhered this to an A5 white card base and sliced the card at the bottom to give me a very narrow border

    To complete a personal verse was inserted

    INGREDIENTS:
    • White card stock ~ Papermill Direct
    • Shadow Box Collection/New Arrival ~ Creative Expressions (CE) CED9307
    • Shadow Box Collection/Stitched Lattice Frames ~ CE  CED9303
    • New Arrival/Little Treasures ~ CE  CED9308
    • New Arrival/Stork And Baby ~ CE  CED10024
    • Love Hearts Embossing Folder ~ CE
    • Cosmic Shimmer Dries Clear Acrylic PVA Glue ~ CE
    • Platinum Die Cutting & Embossing Machine ~ Spellbinders
    Thank you for taking the time to visit my blog, I hope my designs have given a little inspiration.
    I read all your comments and really appreciate you leaving me a message.
    June x

    Wednesday, 26 July 2017

    HAPPY BIRTHDAY TO YOU

    Hello and welcome...
    Today's card was made for a very dear friend of ours, whose surname happens to be Pears....

    I stamped the image onto white card stock using a StazOn Jet Black Ink Pad.  I thought this particular stamp was by Clarity Stamps, but when I've checked their website it doesn't show.  I apologise for that but if anyone can identify the make I'd be grateful!

    I used several watercolour pencils from one of my old sets


    The focal point is on a 7cm square card.  I added mounting foam to the back and adhered it to a 12cm square white card.  Mounting foam was, again, added to the back for dimension and adhered to a 15cm square card base


    Before I adhered the final two layers I stamped both sentiments, again using a StazOn Jet Black Ink Pad onto the base card.  A personal verse was inserted to complete the card


    INGREDIENTS:
    • White card stock ~ Papermill Direct
    • ?Pear stamp ~ Clarity Stamps
    • Watercolour pencils ~ Derwent Pencil Perfection
    • Stamp Set ~ Creative Expressions
    • StazOn Ink Pad ~ Tsukineko
    Thank you for taking the time to visit my blog, I hope my designs have given a little inspiration.

    I read all your comments and really appreciate you leaving me a message.
    June x

    Tuesday, 25 July 2017

    ENJOY ~ RELAX

    Hello and welcome...

     For today's card I've used the free stamps that come with the magazine 'Creative Stamping' Issue 46 .  There are approximately 38 stamps in this set, called 'Garden Retreat' by Joanna Sheen, well worth the investment of the cost for the magazine, as it's only £7.99 and there are loads of tips, competitions and freebies for you to win!


    For my card I stamped the tree twice onto white card stock as well as stamping the hammock.  I used several Chameleon Colour Tones to add colour to the hammock, trees and 'grass'.  The images were stamped using StazOn Jet Black, I didn't press too hard when stamping as I wanted a softer image.
    Using PK3 Bubble Gum, I dabbed colour onto both tree branches and at the bottom of the trees, I then used RD4 Crimson Red and added smaller dots to the pink areas


    I coloured the hammock with NU3 Fawn then added a darker colour BR2 Hot Cocoa.  I used a Pen Touch in Silver to add a 'chain' from the hammock ends to the trees.The 'grass' was created using YG3 Spring Meadow.  Using a smoothie that had one of the blue Distress Inks on it I gently rubbed it across the card


    For the BBQ  I stamped the image, coloured the legs and long fork with the Pen Touch in Silver, for the sausages I used BR2 Hot Cocoa and with OR4 Seville Orange and RD4 Crimson Red I covered the stamped lines of 'fire' as well as colouring the 'coals'


    I stamped the grass cutter, coloured the handles with the Pen Touch in Silver and added a little black to the wheels.  I also added a little green to the grass using YG3 Spring Meadow and stamped one of the sentiments with StazOn Jet Black.  I used one of the pierced rectangles to die cut the hammock/tree image, an oval pierced die for the grass cutter and a circular pierced die for the BBQ


    I also used 3 different smoothies that already had colours on them to ink around the edges of all 3 die cuts


    I added one layer of green card to the 8" square card base, arranged the 3 three die cut images then placed 2 of the sentiment stamps onto the card, removed the die cuts, inked the stamps and stamped onto the card


    The hammock/tree design was adhered to the card using wet glue, I added mounting foam to the other 2 die cut pieces then adhered those to my card
    Creative Stamping Magazine

    The Free Stamp Set


    Thank you for taking the time to visit my blog, I hope my designs have given a little inspiration. I read all your comments and really appreciate you leaving me a message.
    June x

    Monday, 24 July 2017

    WHITE AND GOLD ~ JUST FOR YOU & CARD WINNER

    Hello and welcome...


    Today's card is a 5"x7" white card base

    • I started by embossing a piece of white card with the Ornate Rose Embossing Folder.  I then adhered this onto a piece of Bright Gold Foundation Card, and glued this onto the 5"x7" white card base, which covered the base card completely
    • I die cut and embossed 2 dies from the Jewels 1 die set in the same bright gold card
    • Using the Delicate Daises - Complete Petals I die cut 4 of the smaller flowers on white card twice
    • I then used the Delicate Daises - Open Petals to die cut 4 more flowers in the bright gold card twice
    • I glued the bright gold open petals onto the matching white closed petals then shaped the flowers
    • The flowers were adhered to the card, as were the 2 Jewels 1 die cuts then, using Archival Ink in  Coffee, I stamped the sentiment onto the card front
    • To complete I stamped a verse onto more bright gold card and used part of the Atlantic Ocean Background Die Set to die cut around the sentiment prior to placing it inside the card
    Card Verse
    INGREDIENTS:
    • White card stock ~ Papermill
    • Bright Gold Foundation Card ~ Creative Expressions (CE)
    • 1123 - Jewels 1 Die Set ~ Elizabeth Craft Designs
    • Delicate Daisies Complete Petals ~ CE   CED1417
    • Delicate Daisies Closed Petals ~ CE   CED1416
    • Delightful Sentiments (sentiment) ~ CE
    • Amazing Sentiments (verse) ~ CE
    • Cosmic Shimmer Acrylic Glue ~ CE
    • Archival Ink Pad in Coffee ~ Ranger
    • Adirondack Pitch Black ~ Ranger
    • Platinum Machine ~ Spellbinders
    We used Random.org Name Picker and the owner of Saturday's card is

    JANE ROWSON
    congratulations, please email me your postal details to claim your card
    

    *Nana711.... the dies used on Saturday's card give-away are from the Atlantic Ocean Background Die by Sue Wilson/Creative Expressions.  CED 13001 £19.99


    Thank you for taking the time to visit my blog, I hope my designs have given a little inspiration I read all your comments and really appreciate you leaving me a message June x

    Sunday, 23 July 2017

    PINK FLORAL PROFUSION OVERLOAD - FOR A VERY SPECIAL AUNTIE

    Hello and welcome...

    Today's card is for a very special lady, my auntie, who will be 86 in a few days time.  Even though she lives three and a half thousand miles away we speak several times per week and we are so very close.  She loves flowers and this is my birthday bouquet to her

    I have used several dies for the flowers as well as using some from Wild Orchard Crafts

    The card is a 7" square, top folding.  I typed the sentiment, attached a piece of double sided adhesive sheet over it and used a round die to die cut and emboss it.  I removed the backing from the adhesive sheet and sprinkled Glitter Jewels in Diamond Sprinkles over it, added mounting foam to the back then adhered it onto my card

    To complete, a personal verse was placed inside the card

    The card was boxed and is now winging its way to Canada

    Thank you for taking the time to visit my blog, I hope my designs have given a little inspiration I read all your comments and really appreciate you leaving me a message June x

    Saturday, 22 July 2017

    SATURDAY SPECIAL ~ CARD GIVE-AWAY


    Hello and welcome...

    This is the card on offer for today's give-away.  If you click on the image you'll see how gorgeous the gold polished silk glitter is

    The card is a pretty pale delicate lemon and I have added a contrasting black card

    I also used Polished Silk Glitter in gold by Creative Expressions.  The glitter is fantastic and I wouldn't use anything else!  It is so smooth and does not move off the card

    The card is a 6" square

    If you would like to own the card please leave me a message, you have until 9.30am Monday to comment before I use Random.org Name/Number picker to choose the winner.  I will announce who has won later that day

    We ship international therefore anyone is eligible and welcome to comment

    Have a great weekend

    Enjoy...

    Thank you for taking the time to visit my blog, I hope my designs have given a little inspiration.
    I read all your comments and really appreciate you leaving me a message.
    June x

    Friday, 21 July 2017

    FLOWERS AND GILDING FLAKES

    Hello and welcome...
    Before I described today's card I want to say "thank you to my new subscribers and I appreciate you clicking the follow button"

    This is a white DL card (10cm x 21cm) I made several layers of black and white card, on the final white card I cut and embossed the filigree vase.  I omitted to use the outer cutting die so to keep it 'in' the layer

    On a separate piece of white card I added a piece of double sided adhesive, removed the backing and sprinkled gilding flakes over it.  I used a piece of 'rubit scrubit' to embellish the flakes

    On the same gilded card I die cut and embossed the flowers and the remaining gilded card was adhered behind the vase

    I then adhered this white card onto the final layer of black card and glued the flowers onto it

    To complete I added a small white bow and a gem

    Thank you for taking the time to visit my blog, I hope my designs have given a little inspiration.  I read all your comments and really appreciate you leaving me a message.
    June x

    INGREDIENTS:
    • Black Foundation Card ~ Creative Expressions (CE)
    • White pearlised Card ~ Crafter's Companion
    • Filigree Vase ~ Spellbinders
    • Flowers ~ Spellbinders
    • 'Rubit-Scrubit' ~ Ranger
    • Bow ~ my stash
    • Embellishment ~ my stash
    • Cosmic Shimmer Dries Clear Acrylic Glue ~ CE
    Don't forget tomorrow is the card give-away!
    We hope to see you back then

    Thursday, 20 July 2017

    HAPPY BIRTHDAY

    Hello and welcome...
    For today's card I used a 5"x7" white card for my base.  I cut a smaller piece of white card and with a blending tool I lightly applied colour over the centre of the card using Distress Oxide Inks, 'cracked pistachio' 'broken china' & 'fossilized amber'

    I then spritzed water over the card and heat dried it

    Using one of the pierced oval dies I cut and embossed the coloured image and ran the blending tool around the outer edge.  I used wet glue to adhere to my card base

    Keeping with the white card I die cut and embossed the Queen Anne's Lace Die Set  and arranged and adhered the flowers onto my card.  I then added 3 small green gems to each flower base

    The sentiment is from a freebie set in September's Papercraft Inspirations Magazine

    I stamped a verse onto some pretty paper and adhered it in my card.  With the left over paper strip I glued it onto the edge of the envelope


    The card verse and envelope

           INGREDIENTS:
    • White card stock ~ Papermill Direct
    • Distress Oxides ~ Ranger
    • Queen Anne's Lace Die Set ~ Sue Wilson/Creative Expressions
    • Sentiment ~ Freebie with Papercraft Inspiration
    • Gems ~ Hobby House
    • StazOn Jet Black Ink Pad ~ Tsukineko
    • Cosmic Shimmer Dries Clear Acrylic Glue ~ Creative Expressions


    Thank you for taking the time to visit my blog, I hope my designs have given a little inspiration.
    I read all your comments and really appreciate you leaving me a message.
    June x


    Thank you for taking the time to visit my blog, I hope my designs have given a little inspiration I read all your comments and really appreciate you leaving me a message June x

    Wednesday, 19 July 2017

    MAKE TODAY A MOMENTOUS DAY

    Hello and welcome...


    My apologies for the lack of a video yesterday, we're having on-going technical problems but I am hoping the technical support team (my son and grandson) will come to my aid later today!

    For today's card I covered a 6" square piece of white card stock with a mask and using 'peeled paint Distress Oxide' I randomly applied the ink, mostly in the centre of the card

    I then heat embossed the flower stamp, by Woodware,  using Perfect Medium and Cosmic Shimmer Embossing Powder in True White

    I coloured the 'flowers' using a 'worn lipstick Distress Marker' and the stems with 'mowed lawn Distress Marker'

    I added a few lines at the bottom of the image so that it wouldn't look as if it were floating

    I then stamped a sentiment, that is part of the stamp set, using StazOn Jet Black Ink

    To complete I added the card onto a neutral paper by Craftwork Cards then onto an 8" square white card base

    Thank you for taking the time to visit my blog, I hope my designs have given a little inspiration I read all your comments and really appreciate you leaving me a message June x

    Tuesday, 18 July 2017

    DREAM

    Hello and welcome...


    Here is today's card.

    This is an A5 size card and, hopefully, later today,  a video will be posted on how I made the card!

    I hope to see you back then.

    Thank you for taking the time to visit my blog, I hope my designs have given a little inspiration
    I read all your comments and really appreciate you leaving me a message

    June x

    Monday, 17 July 2017

    NEW CHALLENGE AT CRAFTY CARDMAKERS

    Hello and welcome...
    The new challenge starts today at Crafty Cardmakers and this is my contribution to the design team

    Chanya is hosting this challenge and the theme is 'Lots Of Layers'

    I layered my card using Spellbinders's Scalloped Oval Dies in white card and pink paper.  The paper is by Craftwork Cards

    The Gazebo, also by Spellbinders, was die cut in white card then I placed the die onto the pink paper and only embossed it.  I then cut around the outer image and glued the gazebo onto the pink paper

    To complete I added a row of pearls to the top of the card and die cut the sentiment, also by Spellbinders, in white card, 3 times and once in the pink paper.  The white layers were glued together then added onto the pink paper, slightly overlapping, to give a shadow effect.  I also glittered the white sentiment with Glitter Jewels 'Diamond Snow' by Creative Expressions,  prior to adhering to the card

    I also only glued either ends of the sentiment onto the card to enable me to 'bow' the sentiment

    The card size is 5"x7"


    I would like to enter this card into the following challenges:

    If you click on the link below it will take you to our Crafty Cardmakers blog where you'll see the fabulous designs by my teamies, plus you may want to enter the challenge too!  I'd love to see your card in the challenge

    Crafty Cardmakers Challenge - #193 Lots Of Layers!


    Please read the rules and note our 15 challenge limit

    ~~~~~~~~~~~~~~~~~~~~~~~~~~~~~~~~~~~~~~~~~~~~~~~~~~~~~~

    Paper Craft Happy is a fairly new craft blog and I am so pleased to announce that I am also on their design team.  Today starts their 3rd challenge with the theme of

    Challenge #3 'Anything Goes With Glitter Or Bling'

    the card on the right is my contribution

    The challenge is sponsored by Fabrika Fantasy and the winner of this challenge will get 3 free digistamps from our sponsor


    This is the link to Fabrika Fantasy's Store:


    http://www.fabrikafantasy.com/store


    Again, please take a visit to Paper Craft Happy and why not enter your own card into the challenge

    Please remember to read our challenge rules

    I have used lots of Polished Silk Glitter, in various colours, on my card and Gilding Flakes both by Creative Expressions
    The image is one by Fabrika Fantasy and using the 'fantasy' I added a sentiment of 'Once Upon A Fantasy' as well as colouring the girl's hair in shades of blue and gold using Pixie Powders by Creative Expressions


    Thank you for taking the time to visit my blog,
    I hope my designs have given a little inspiration.
    I read all your comments and really appreciate you leaving me a message.
    June x
    Hello and welcome...

    The winner of Saturday's card is...

    aunty Millie


    please email me your postal address to:


    poppyfieldcardcrafts@outlook.com
    Today's card will be posted at 2pm, I have a few announcements to make and it would be great to see you back here then

    Thank you for taking the time to visit my blog, I hope my designs have given a little inspiration.
    I read all your comments and really appreciate you leaving me a message.
    June x

    Sunday, 16 July 2017

    JUST FOR YOU

    Hello and welcome...
    I started with a 7" square ivory card base

    The two blue papers, are from Craftwork Cards, and I layered the darker blue onto the card base

    I used the blue pearlised card by Crafter's Companion, cut it to size and layered the lighter, pearlised blue card onto it

    I added a strip of red line tape to the bottom of the horizontal layer and attached a piece of white lace to it then adhered it to my card

    I added mounting foam to the vertical layer and also adhered it to the card

    I used Collal 3D Glue by Crafter's Companion to  adhere all the flowers in place

    Next I die cut and embossed the Medallion Six Die Set by Spellbinders, onto more of the pearlised blue card by Crafter's Companion, then adhered that, at a jaunty angle, to the card

    From the same freebie stamp set that I used on Thursday's card I chose another sentiment stamp and using a  StazOn Jet Black Ink Pad I stamped it onto ivory card then die cut it with the smallest die from the Medallion Six Die Set and adhered to the card

    To complete I used NUVO Crystal Drops in Oyster Grey around my card as a faux pearl embellishment

    If you would like to be in the draw for yesterday's card don't forget you have until 9.30am tomorrow to comment on yesterday's post

    Last week's card wasn't claimed so that will be used again at a later date

    Thank you for taking the time to visit my blog, I hope my designs have given a little inspiration.
    I read all your comments and really appreciate you leaving me a message.
    June x
    Code line 7 9 is for loading jQuery library. Remove this line if you’ve already loaded it somewhere else in your blog. Hint: If your blog has an image slider, carousel or something with fading effect running, chances are it is powered by jQuery. If this widget doesn’t work, the first thing you want to do is comment out or remove this line. To use your own button, replace the URL in line 3 with the direct link URL to the image. Make sure to keep the quotes. To reposition the button, replace center in line 4 with the new position as listed below: