Hello and welcome...
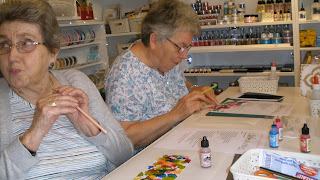
No, it's not your eyesight, panic over! The design is supposed to look this way lol. I love using this technique and for our class on Monday I thought we'd try this just as a 'starter' before we made the 'main' card. The ladies really had a ball creating their own designs and the photographs below show just how serious they were taking their 'blowing' technique. I think they created about 4 designs each and, guess what, in between the chat and coffee break, the 'main' card did not get made but we already had the packs ready so they took them with them, I think I'm right in saying a tad reluctantly ;) to do at home and bring back to the class next month for us to see their finished card :)
So on with this card. I used 4 different alcohol inks to create the 'design' and added a few droplets of colour onto gloss card. It must be gloss card when using these inks otherwise the colour will just soak into ordinary card. With a straw 'at the ready' a few drops of colour was sprinkled onto the gloss card and gentle blowing through the straw sent the colour into different areas. When completed I embossed the card using the ocean waves embossing folder and that is why the card looks 'fuzzy' when photographed, it doesn't in the 'flesh'. I backed this onto a thin black mat, stamped a sentiment using Jet Black StazOn that I also matted onto black card and adhered this to the side of the main focal point. I used a strip of black florist ribbon and cut it into 3 different widths then wrapped it, vertically, around the card. I stamped and embossed a verse onto a 'free paper' set with one of the card magazines. I do love this verse!
INGREDIENTS:
- White card stock ~ Papermill
- White gloss card ~ Creative Expressions (CE)
- Cosmic Shimmer Dries Clear PVA Glue ~ CE
- Ocean Waves Embossing Folder ~ Sue Wilson/CE
- Cosmic Shimmer Detail Embossing Powder, True White ~ CE
- Adirondack Alcohol Inks: Lemonade, Raspberry, Red Pepper, Sail Boot Blue ~ Ranger
- Never Give Up Stamp ~ Visible Image
- With Love Stamp ~ my stash (I think)
- Jet Black Ink Pad ~ StazOn/Tsukineko
- VersaMark Watermark Stamp Pad ~ Tsukineko
- Platinum Die Cutting/Embossing Machine ~ Spellbinders
 |
| Some serious blowing technique going on here lol |
 |
| Marion looks as if she is blowing my hubby a raspberry lol and he only came into the room to make the refreshments haha |
 |
| Mary is still ignoring Marion and concentrating on her masterpiece. Marion is looking set to play a tune on that straw lol |
Thank you for taking the time to visit my blog, I hope my designs have given a little inspiration
I read all your comments and really appreciate you leaving me a message
June x


Just got to love them all great bunch xxsmf
ReplyDeleteyurtdışı kargo
ReplyDeleteresimli magnet
instagram takipçi satın al
yurtdışı kargo
sms onay
dijital kartvizit
dijital kartvizit
https://nobetci-eczane.org/
SXKK6
salt likit
ReplyDeletesalt likit
dr mood likit
big boss likit
dl likit
dark likit
628BJA