Followers

Wednesday 8 March 2017

MOTHER'S DAY WITH A DIFFERENCE


Hi friends... thanks for popping by

Today's card is a commission and the message was "she loves horses and I'll leave the rest to you"
I downloaded the above image of horses from a company named  GraphicStock.
I also decided to make an easel card and introduced pinks and blues for my colour combo.  The card itself was not a bright as shown, in fact it was a lovely muted shade of pinks and blues!
Once I created the easel for the card I die cut the horse's picture using double pierced ovals by SW for CE.  I also used this die set to create the blue and pink frame as well as die cutting some patterned vellum that I wanted to use over the main image, to soften the tones.
I cut several layers of the border die and adhered them together to give dimension but to also create a step effect to support the upper part of the card.  This was then adhered to the base of the card where I had previously die cut an oval using pink card.
I printed a verse and adhered it to the back of the card, attached a few blue, pink and white flowers, stamped the Happy Mother's Day sentiment onto white card then die cut it, added mounting foam to it and attached it to the card.  Three pink gems and one white butterfly completed ensemble

Thank you for visiting my  blog, I do read all your comments and they are very appreciated

June x

Tuesday 7 March 2017

TUESDAY TUTORIAL ~ LOVE YOU FOREVER


Hi friends... thanks for popping by

We have a CAS card (clean and simple) for today's tutorial, so let's get started


The above card is today's tutorial
I began with a white DL card base and decided to use it landscape


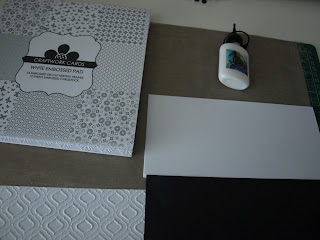
I cut a strip of black card for the centre of the card then a piece of white card that was pre-embossed from one of my paper pads by Craftwork Cards.  This card stock and designs are top quality.
I adhered the pre-embossed white card onto the black card then to the card base using Cosmic Shimmer Dries Clear PVA Glue by CE


The card is now prepared for the embellishments and I used several elements from the Prospectives - Love Die Set by SW for CE


Using black card stock I die cut 'LOVE' separately, 3 times, then, once only for 'YOU' and 'FOREVER'
I adhered the 3 LOVE to each other to give dimension and position it onto the card.  I used spray adhesive by Crafter's Companion, to adhere 'YOU' in position on the card and again with 'FOREVER'


A verse was inserted to complete the card

Thank you for visiting, all your comments are very appreciated
Happy crafting...

June x


Monday 6 March 2017

BLACK, WHITE, RED AND A LITTLE GLITTER


Hi friends... thanks for popping by and welcome to a new follower, Shirley-Anne :)

The base card I have used is an A5 white card with scalloped edging.  To this I added mat and layers of pretty red paper, from my stash, alternating with white card and finishing with a red top layer.  I used both the outer and inner dies from the Cascading Butterflies set to create the main focal point.  Once cut I then embossed the butterflies using *Ocean Waves EF.  These were then adhered to the card and the outer die cut was placed on top of the image.  I sprinkled a little Glamour Dust around the outer parts of the butterflies,
I then cut and embossed 3 of the Daisy Cluster Die Set in black and adhered these together to give some dimension and with the other set of the 3 flower die I cut and embossed that onto white card.  These were then adhered to the daisy cluster and black flat back pearls were added to the centres. 
To complete I added  3 more black flat back  pearls to the top right of the card, stamped a verse and inserted it inside the card
*If you click onto the card image you will see the embossed detail on the butterflies


Tomorrow is Tuesday Tutorial, it'll be good to see you here again


Thank you for visiting, your comments are so appreciated

June x
Ingredients:
  • Cascading Butterflies Die Set by SW for CE
  • Ocean Wave EF by SW for CE
  • Daisy Cluster Die Set by SW for CE
  • Glamour Dust by DecoArt


AND THE WINNER IS....


Good morning blog friends

Using Random.org name picker the winner of Saturday's card is...

Pam
please email me at:


with your postal details

Back later today

June x

Saturday 4 March 2017

JUST FOR YOU ~ SATURDAY SPECIAL GIVE-AWAY CARD


Hi friends, thanks for popping by...


This is a grey and white (with just the tiniest hint of blush pink) card.
Off camera the card is not as dark as it's showing here!  When I attempted lightening it the result was not good.
If you would like to give this card a new home just leave me a comment and the winner will be announced Monday.
International friends are very welcome too!


This is a closer shot of the card, it's only a tad better than the one above, but you can see the sparkles more on this one

Thank you for visiting my blog, all your comments are so appreciated

June
x


Friday 3 March 2017

BELIEVE


Hi friends... thanks for popping by
Today's colour theme is teal and white.
I have used a selection of dies from Spellbinder's Persian Accents Set.  The border die for the bottom on my card, one corner piece , as shown, and one other for the main focal point.
I cut two borders, one in white and the other on the teal card.  I slightly overlapped the white underneath the teal to give a shadow effect.  The corners were die cut and I added white card to the back for contrast.
Next, using white card, I die cut 3 more pieces from the set.  I snipped off one of the pointed pieces on the two outer die cuts, making it less bulky to cut out .  One of Phill Martin's/Sentimentally Yours  stamp range was used to stamp the sentiment
That's all for today.
Don't forget tomorrow is the Saturday Special Give-Away Card!

Thank you for vising my blog, all your comments are so appreciated

June x


Code line 7 9 is for loading jQuery library. Remove this line if you’ve already loaded it somewhere else in your blog. Hint: If your blog has an image slider, carousel or something with fading effect running, chances are it is powered by jQuery. If this widget doesn’t work, the first thing you want to do is comment out or remove this line. To use your own button, replace the URL in line 3 with the direct link URL to the image. Make sure to keep the quotes. To reposition the button, replace center in line 4 with the new position as listed below: