Followers

Tuesday 28 February 2017

TUESDAY TUTORIAL ~ TO SOMEONE VERY SPECIAL


Good evening!!

It is now!  Unfortunately there have been technical problems with my PC connection and this post was scheduled for 6am this morning!... it never happened!
So, here we go with our first tutorial


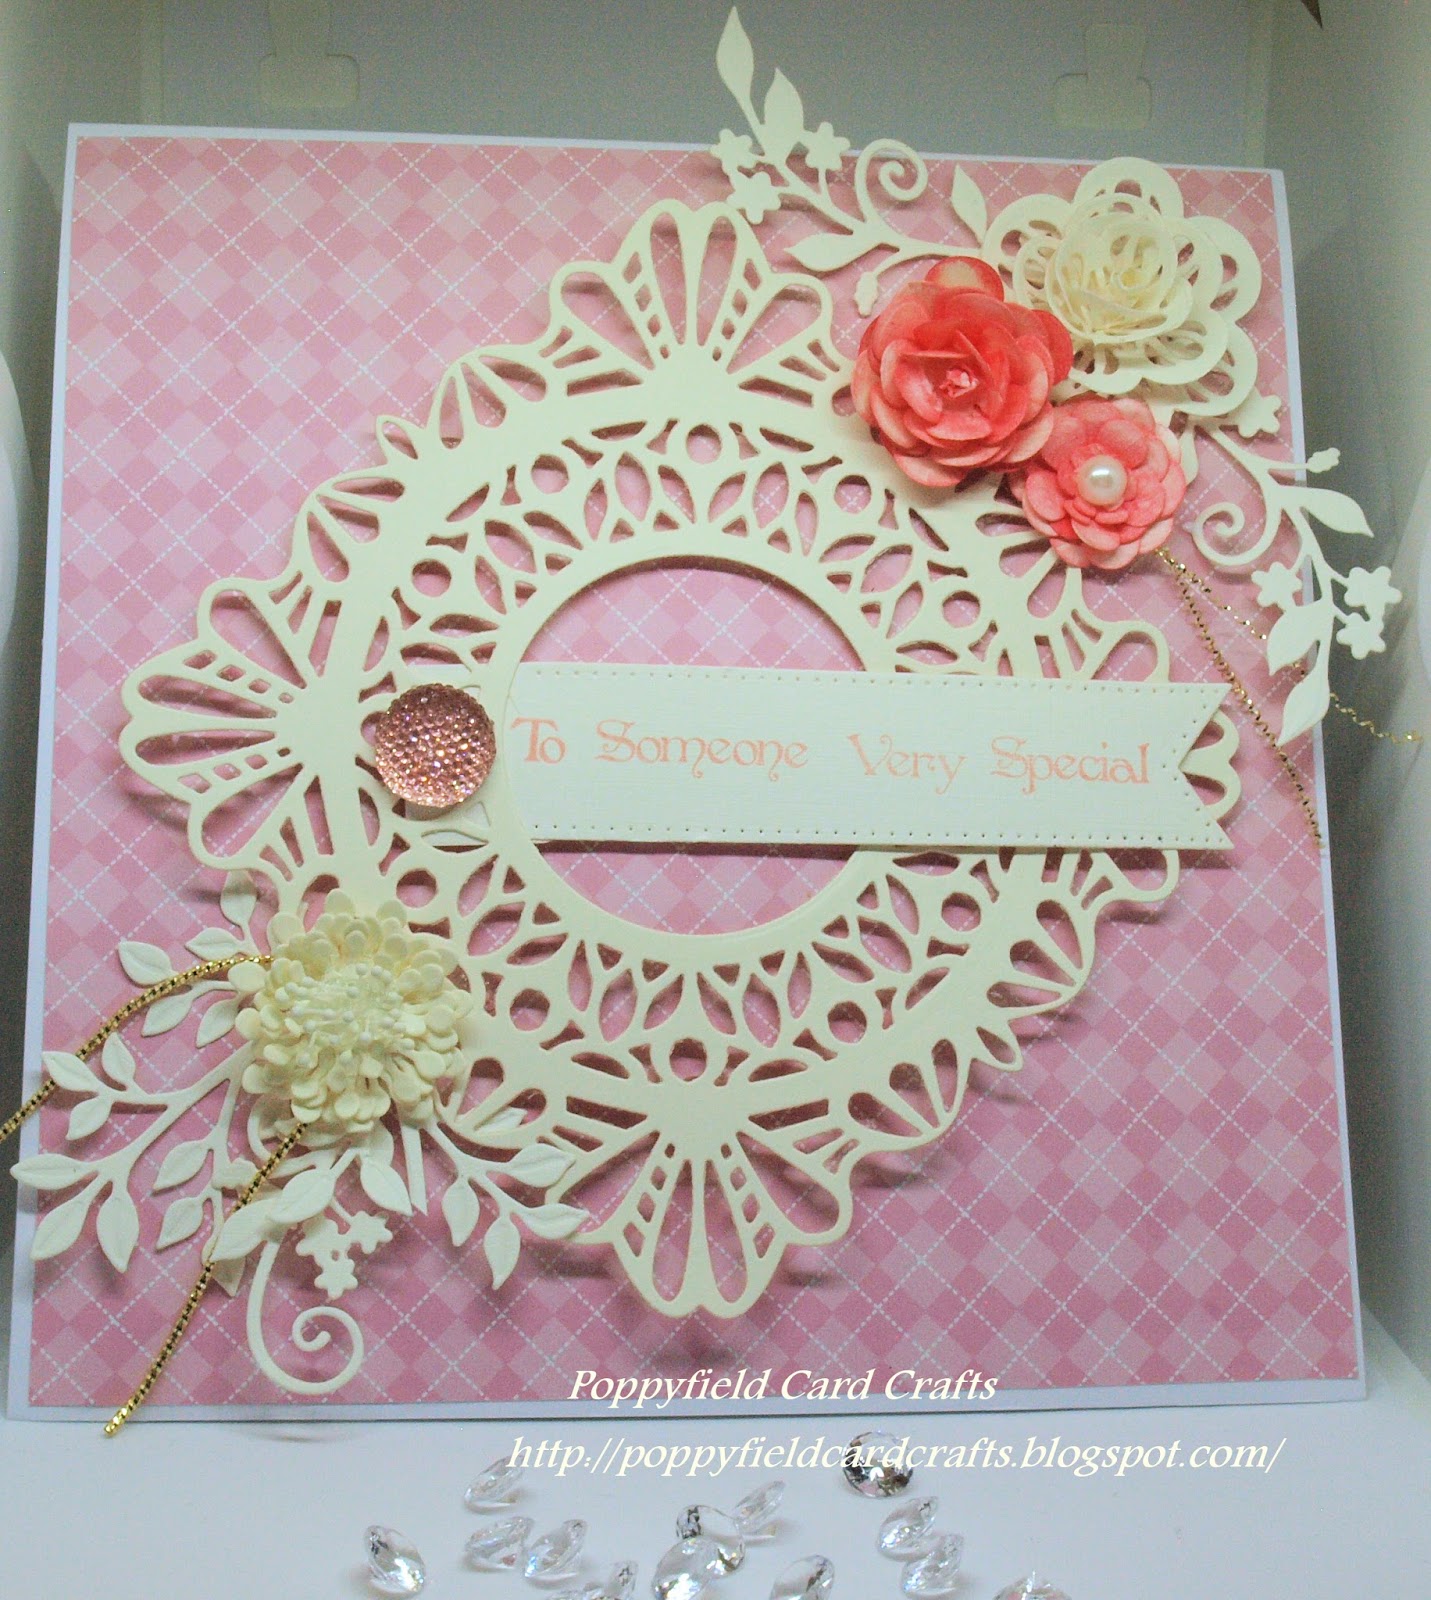
I started with an 8" square white card base and added a pretty pink paper, from my stash, to it leaving a narrow border.  I die cut the Umbria set from SW's Italian Collection, in ivory card.  I used all 3 dies but omitted using the centre one on my card.  I used the same coloured card for the flower at the top right as I already had the bottom left flower made and stored

I also die cut several pieces from the Spring Foliage ~ Finishing Touches Collection  and again using the Blossoming Branch from the same collection by SW in ivory card
I dusted two of the flowers with Tattered Rose and Victorian Velvet Distress Inks by Ranger.  I added a rose centre to the larger pink flower and a flat back pearl to the smaller pink flower
I added ivory stamens to the bottom left flower 
I stamped the sentiment, from Phill Martin's Baroque Border Sentiments, again using Tattered Rose, onto ivory card (in hindsight I should have used a darker shade or even a coffee coloured ink) and die cut it using the middle pierced flag, then added mounting foam to the back and placed it within the left side of the main focal point.  I then added a pink dazzler onto the edge of the tag
The remaining ivory flower and leaves were arranged and adhered to the bottom left of the card plus a little metallic gold linx by Creative Expressions was also added to opposite corners

More tomorrow

Thank you for visiting

June x


Monday 27 February 2017

And The Winner Is...

Good morning friends

Using Random Name Picker.Org
the person who will be giving
 Saturday's Card Give-Away
 a new home is...
Angela Radford
Congratulations Angela!

Please email me your postal details to

Our Saturday Give-Aways run every week throughout the year so please call back next week (daily would be even better lol)

My post for today will be showing at 1pm

Thank you for visiting...

June x


NEW CHALLENGE AT CRAFTY CARDMAKERS ~ GO GREEN

Today is a new challenge at Crafty Cardmakers,
the theme is 'Go Green'

Please pop over to their blog, Crafty Cardmakers, to see the other designs and inspiration from my very talented design teamies
I chose to make a tag showing lots of green but also to incorporate stash I had stored!
I covered the tag using white Gesso, then gave it a coating of Distress Ink in Pine Needles.  When dry I randomly smoothed a little more of white Gesso 


The paper flowers are made free hand, as are the leaves.  The foliage is also from my stash
I matted a piece of orange paper onto black card and adhered it to the tag.  The flowers, leaves and foliage were arranged and also adhered to the tag
I used an old stamp set to stamp the word FUN, each letter on a different coloured paper, then matted to black card.  I tweaked two letters for a little dimension
To complete I covered each letter with Glossy Accents and left
them overnight to dry completely.  When dry I adhered each letter to the tag

Thank you for visiting, I do read all your comments

June x


Saturday 25 February 2017

HAVE A TRULY FABULOUS DAY! & SATURDAY GIVE-AWAY CARD


Hi... thanks for popping by


If you would like to give this card a new home leave me a comment and the winner will be announced Monday
I will post to any country!


Next week will see the first of my 'Tuesday Tutorials'... keep visiting!

Hope you all have a great weekend

Thank you for visiting my blog

June x

Friday 24 February 2017

JUST A REMINDER


Hi blog followers, apologies for there not being a card posted for today but please come back tomorrow as it's the
Saturday Special Give-Away Card


June x

HAPPY MOTHER'S DAY..... again!


Hi and welcome, thanks for popping by

First things first, my apologies for not posting yesterday, the card above was for yesterday!  I'm afraid the 'old war wounds' were pretty bad etc etc
So let me get straight down to the card.
Using A4 Baby Pink Foundation Card I scored it in half to create an A5 portrait card.  I also cut several thin layers of the pink and white card. On a piece of white foundation card I stamp and heat embossed the sentiment Happy Mother's Day by Clarity using WOW Gold Satin Pearl Embossing Powder.  Next I cut the Cascading Butterflies Die using White Foundation Card, I didn't use the outer cutting die as I wanted the image of the butterflies only.  I then embossed this card with one of my folders from my stash.  I cut 2 of the same elements from the Kinetics - 3D Window Box & Accessories in white card.  I used 4 different shades of ProMarkers to colour the flowers  and window boxes, highlighted the tulips using a white pencil, added mounting foam to the back of the window boxes, from that set and adhered 3 small flat back pearls to each box and to the centres of the smaller flowers.
I chose 3 of the butterflies, sprayed them with adhesive glue and sprinkled Diamond Sprinkles Glitter Jewels over them.  I then removed the excess, applied Cosmic Shimmer Dries Clear PVA Glue to the centre of each butterfly and added white flat back pearls.
Where the butterflies had been cut., on the white card, I applied some double sided adhesive sheet to cover the cut image on the back of the card, then working on the front of the card I used Golden Jewels Gilding Flakes to the butterfly shapes, and, with a piece of Rubit Scrubit I burnished the gilding flakes.
I used one of my tag dies from my stash to cut and emboss the sentiment then gently dusted a little distress ink, around the edges, using one of my smoothies that already had Victorian Velvet Distress Ink on it.  Mounting foam was applied to the back of the sentiment and adhered to the card.  I also adhered the smallest butterflies to the edge of the sentiment.
I applied Cosmic Glue to the spine of the two remaining butterflies and adhered to the matching gilded images.  The window boxes were adhered to the base of the card, a verse attached to the card inside and that was the card finished

Thank you for visiting, I do like to read all of your comments and it also lets me know you've called

June x
Materials & Suppliers

  •   white and baby pink foundation card:  Creative Expressions
  •   Cascading Butterflies Die Set:  CE
  •   3D Window Box & Accessories:  CE
  •   Gilding Flakes:  CE
  •   Cosmic Shimmer Dries Clear PVA Glue:  CE
  •   flat back pearls:  CE
  •   Happy Mother's Day Stamp:  Clarity Stamps
  •   Golden Satin Pearl Embossing Powder: WOW
  •   Watermark Stamp Pad:  VersaMark


  • Wednesday 22 February 2017

    IDEAL FOR BAKERS - HAPPY MOTHER'S DAY


    Hi... thanks for popping by
    This is a cute Mother's Day Card especially if the recipient is a baker!
    I love this Sherbet Foundation Card by CE.  I folded an A4 piece of this card to create a portrait A5.  Using one of the  pierced oval dies from SW's collection, I cut a piece of white foundation card then embossed it using Cascading Hearts EF by SW.  This was then adhered, at a jaunty angle, to the card base.  I then cut and embossed several pieces from the Necessities - Apron Die Set by SW for CE.  I used paper from Smirk 6"x6" Designer Paper Pack to cut the apron.  I also cut an extra piece for the 3 pockets and cut these landscape.  Mounting foam was attached to the back and adhered to the apron.  The single pocket, rolling pin, mixing spoon, spatula and oven mitts were cut and embossed on white foundation card.  I used an already inked smoothie to add some colour to the single pocket, mitts, spatula and mixing spoon.  I also used some pre-cut mini, mini hearts, adhered two together and placed them on the centre of the single pocket.  Using silver mirri card I then cut and embossed the set of measuring spoons and whisk.  The apron strings were cut from very narrow white satin ribbon.  The You're One In A Million sentiment is from SW's Kinetics Range - Candy Machine.  I cut and embossed it onto sherbert foundation card then using the outer die cut another piece of white foundation card and adhered the sentiment to it.  Mounting foam was also added to the back of this to give dimension.  I typed Happy Mother's Day onto copy paper and adhered it to the rolling pin

    Thank you for visiting and taking the time to leave me a comment, which I do appreciate

    June x
    
    Code line 7 9 is for loading jQuery library. Remove this line if you’ve already loaded it somewhere else in your blog. Hint: If your blog has an image slider, carousel or something with fading effect running, chances are it is powered by jQuery. If this widget doesn’t work, the first thing you want to do is comment out or remove this line. To use your own button, replace the URL in line 3 with the direct link URL to the image. Make sure to keep the quotes. To reposition the button, replace center in line 4 with the new position as listed below: